Launch SDK
The Python control SDK for the A1Z six-axis robotic arm provides CAN bus motor driving, Pinocchio-based gravity compensation, forward/inverse kinematics, zero-force teaching, and position holding.
SDK Code Structure
    a1z/
    ├── pyproject.toml                 # Build configuration (flit)
    ├── setup.py                       # setuptools fallback
    ├── README.md
    ├── a1z/                           # Main SDK package
    │   ├── dynamics/
    │   │   └── gravity_model.py       # Pinocchio RNEA gravity compensation
    │   ├── motor_drivers/
    │   │   ├── can_interface.py       # CAN bus wrapper
    │   │   ├── motor_a_driver.py      # MotorA driver (MIT hybrid control)
    │   │   ├── motor_b_driver.py      # MotorB driver + MixedMotorChain
    │   │   └── utils.py               # Data structures, float↔uint conversion
    │   ├── robots/
    │   │   ├── robot.py               # Robot Protocol (abstract interface)
    │   │   ├── arm_robot.py           # ArmRobot implementation (control loop + gravity compensation)
    │   │   ├── get_robot.py           # Factory function get_a1z_robot()
    │   │   └── kinematics.py          # FK/IK (Pinocchio)
    │   ├── robot_models/
    │   │   └── a1z/                   # URDF model files
    │   └── utils/
    │       └── utils.py               # RateRecorder, logging utilities
    ├── examples/
    │   ├── gravity_comp.py            # Gravity compensation example
    │   └── position_hold.py           # Position holding example
    └── tools/
        ├── motor_diag.py              # Motor communication diagnostics and troubleshooting
        └── set_zero.py                # Motor zero-position calibration
                    Robot Protocol (robot.py)
                           │
                      ArmRobot (arm_robot.py)
                     ╱          │           ╲
          GravityModel    MixedMotorChain    Kinematics
       (gravity_model.py)  (motor_b_driver.py)   (kinematics.py)
              │            ╱          ╲           │
          Pinocchio     MotorA      MotorB    Pinocchio
           (RNEA)    (motor_a_driver) (motor_b_driver)  (FK/IK)
                          ╲          ╱
                        python-can (SocketCAN)
SDK Dependencies
- Python version: Python 3.10 or later is supported.
- Operating system and communication interface: A Linux system, such as Ubuntu, is required. The computer must have CAN bus hardware for robot control communication.
The SDK communicates with the robot through SocketCAN on Linux. As long as the CAN interface is configured correctly on Linux, no additional driver is required.
- URDF model files: The SDK package already includes the robot model files in URDF format. No manual download is required. The default model file is
A1Z_Flange.urdf, located ina1z/robot_models/a1z/.- You can also obtain URDF model files from the Galaxea open-source GitHub repositories:
Install the SDK
cd /path/to/a1z

# Development-mode installation (recommended)
pip install -e .

# Or install directly
pip install .
Dependencies are installed automatically: numpy, python-can>=4.0, and pin (Pinocchio).
Configure the CAN Bus (SocketCAN Mode)
<span style={{ color: 'red' }}>Note: Check whether the CAN box resistor is installed correctly.
Use the HHS USB-CANFD adapter (VID/PID a8fa:8598):
# 1. Load the driver
sudo modprobe gs_usb

# 2. Bind the HHS adapter to gs_usb (ignore the error if it is already bound)
sudo sh -c 'echo "a8fa 8598" > /sys/bus/usb/drivers/gs_usb/new_id' 2>/dev/null || true

# 3. Confirm that the interface appears (usually can0 for a single adapter)
ip link show type can

# 4. Configure and bring up the interface (1 Mbps)
sudo ip link set can0 type can bitrate 1000000
sudo ip link set can0 up
CAN cable connection:
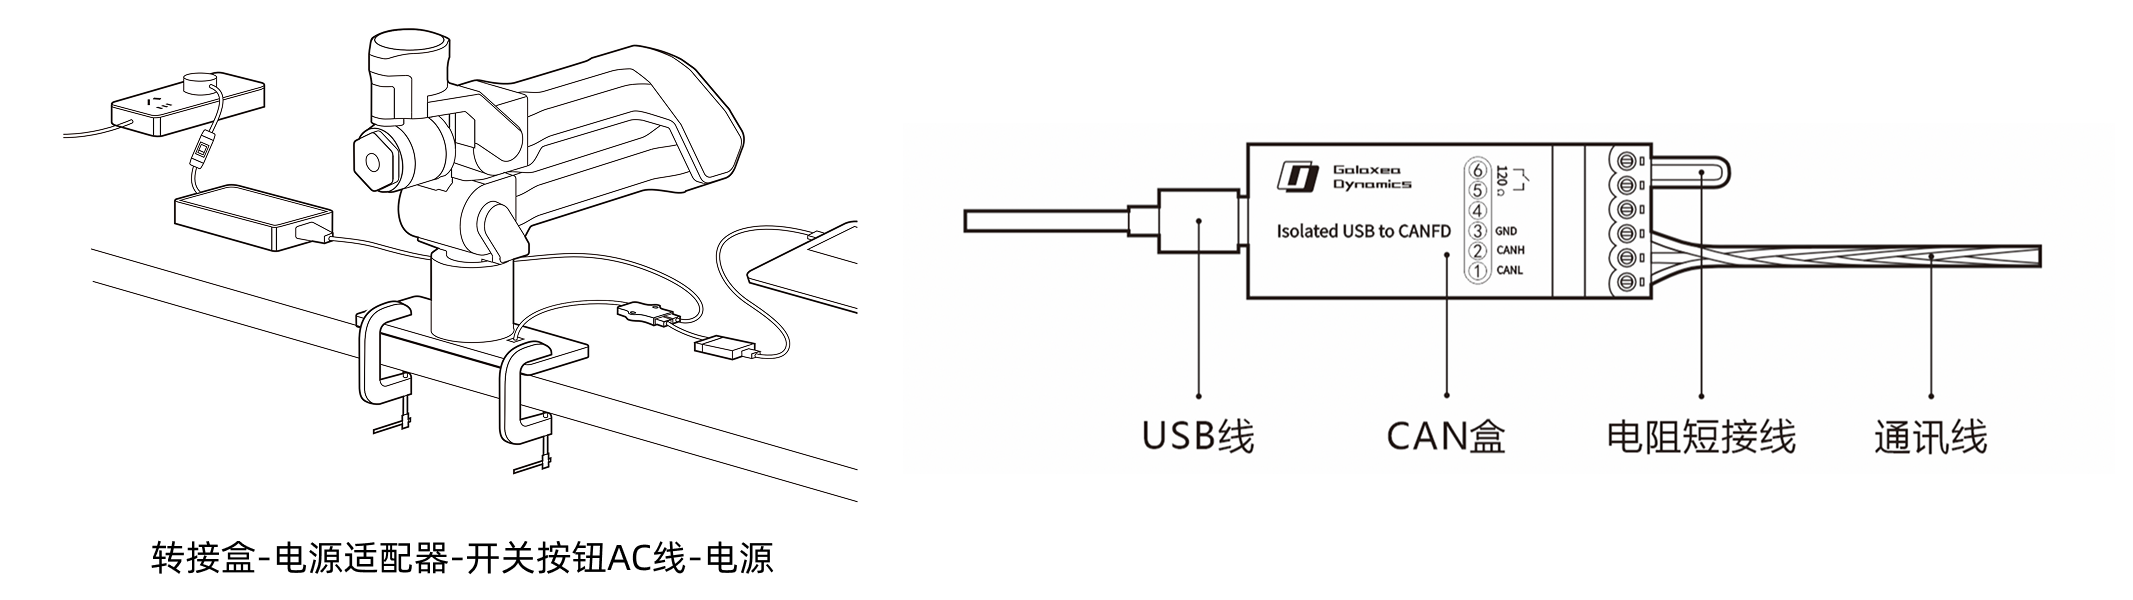 A1Z body and CAN box connection diagram
Connect the cables as follows:
- Communication: connect the cable attached to the robotic arm to the adapter box, connect the cable attached to the CAN box to the adapter box, and connect the USB cable between the CAN box and the host computer.
- Power: connect the cable attached to the power adapter to the adapter box, and connect the switched AC cable between the power adapter and the power source.
The original shorting wire connects a 120Ω termination resistor between pins ⑤ and ⑥ shown in the diagram, adding CAN termination to the CAN bus.
<span style={{ color: 'red' }}>Note: If the original shorting wire is removed, connect one 120Ω termination resistor in parallel at each far end of the bus to ensure stable CAN communication.
Run Example Scripts
# Zero-force floating mode (default URDF A1Z_Flange.urdf, no end-effector load)

# Start with a small compensation factor (recommended for first-time debugging)
python examples/gravity_comp.py --gravity_factor 0.3

# Increase to full compensation after confirming the compensation direction is correct
python examples/gravity_comp.py --gravity_factor 1.0

# Position holding mode
python examples/gravity_comp.py --mode hold

# Position holding + move to target
python examples/position_hold.py --q_target_deg 0,30,-20,-15,0,0 --speed 0.5