R1 Autonomous Navigation System Tutorial
1. Product Introduction
The system includes mapping, localization, navigation, and control modules. The Galaxea R1 robot can build a point cloud map of the environment and use it for global localization, autonomous movement to target points, and obstacle avoidance.
The Autonomous Navigation System is currently a premium feature in beta testing. For detailed inquiries or trial purchases, please contact us at product@galaxea-dynamics.com or call 4008780980.
2. Hardware Introduction
2.1 Performance Parameters
| Localization | Description |
|---|---|
| Localization Method | LiDAR-based SLAM |
| Localization Frequency | 100 Hz |
| Localization Accuracy | <0.05 m |
| Motion Method | Description |
|---|---|
| Control Method | Autonomous Navigation (Path Tracking) Remote control |
| Maximum Speed | 0.6 m/s |
| Obstacle Avoidance Method | Navigate around obstacles |
| Obstacle Avoidance Frequency | 10-20 Hz |
| Network | Description |
|---|---|
| Wired Network | Supported |
| WiFi | Supported |
2.2 Sensor Configuration
The Galaxea R1 is equipped with various sensors, including 9 high-definition cameras and 2 LiDAR units, enabling it to perceive its surroundings in all directions and perform precise operations.

| Sensor | Values |
|---|---|
| Camera | Head: 1 x Binocular Depth Camera Wrist: 2 x Monocular Depth Camera Chassis: 5 x Monocular Camera |
| LiDar | 1 x 360° (Two LiDARs are optional) |
2.2.1 Camera
| Specification | Head | Wrist | Chassis |
|---|---|---|---|
| Type | Binocular Camera | Monocular Depth Camera | Monocular Camera |
| Quantity | 1 | 2 | 5 |
| Output Resolution | 1920 x 1080 @30fps | 1280 x 720 @30FPS | 1920 x 1080 @30fps |
| Field of View | 110°H x 70°V | 87°H x 58°V x 95°D | 118°H x 62°V |
| Depth Range | 0.3 m ~ 20 m | 0.2 m ~ 3 m | \ |
| Operating Temp. Range | -10 °C ~ +45°C | 0 ~ +85°C | -40 ~ +85°C |
| Dimensions | 175L x 30W x 32H mm | 90L x 25W x 25H mm | 30L x 30W x 23H mm |
| Weight | 164 g | 75 g | <50 g |
2.2.2 LiDar
The chassis is equipped with up to two 360-degree LiDARs*, which are of high precision and resistant to interference.
| Units | Single SOC | Dual SOC |
|---|---|---|
| Basic Computating Capability | 8 Core 2.2GHz CPU | 2 * 8 Core 2.2GHz CPU |
| Deep Learning Computing Capability | 200 TOPS | 550 TOPS |
| Memory | 1 x LPDDR5@32G | 2 x LPDDR5@32G |
| Hard Disk | 1 x SSD@1T | 2 x SSD@512G |
| Camera | 8 x GMSL | 8 x GMSL (SoC-1) + 8 x GMSL (SoC-2) |
| Ethernet | 4 x Gigabit Ethernet (M12 cable) | 3 x SoC-1 Gigabit Ethernet (M12 cable) + 3 x SoC-2 Gigabit Ethernet (M12 cable) |
| WiFi Module | M.2 Wifi with AP mode | M.2 Wifi with AP mode |
* One LiDAR is standard, the number of LiDAR configurations can be selected according to user needs.
3. Software Introduction
Please ensure that your environment meets the following software dependency requirements:
- Hardware Dependency: R1 computing unit
- Operating System Dependency: Ubuntu 20.04 LTS
- Middleware Dependency: ROS Noetic
The file will be sent to you by email.
If you need to deploy the navigation system for the first time, please follow the steps below to install the required dependencies:
sudo apt install libsdl1.2-dev
sudo apt install libsdl-image1.2-dev
sudo apt install libsdl2-image-dev
sudo apt install ros-noetic-grid-map-core
sudo apt install ros-noetic-grid-map-ros
sudo apt install libgoogle-glog-dev
4. Localization and Navigation Operation Process
Map building is the foundational step for the robot's autonomous navigation. The robot records map data (bag files) via remote control, processes and builds the map on a local computer, and finally uploads the map to the specified directory on the robot to complete the deployment. By following the tutorial below, you can set the target pose, modify the target file, and run the process to achieve point-to-point navigation.
4.1 Building the Map
4.1.1 Start R1
Log in to the R1 ECU via SSH.
Execute the following command to start R1's relevant nodes.
4.1.2 Record Data Packets
Execute the following command to start recording the bag file.
Control the robot to move within the space to be mapped using the Joystick Controller, ensuring that all areas that need navigation are covered. For the method of operating the robot chassis with the Joystick Controller, please click here to refer.
When the map data recording is completed, press Ctrl + C to end the recording.
Notes:
- Please move the robot to the area to be mapped.
- At the start of the recording, the robot must remain stationary for at least 5 seconds to ensure data quality.
- During the data recording, ensure that there are no dynamic objects (such as moving people or objects) in the environment to avoid interference with map construction.
4.1.3 Data Transmission
-
Download and install the Docker file.
As the file is too large, please email support@galaxea-dynamics.com or scan the WeChat QR code below to add the customer service to get the file.

Visit the page to see the toturial on how to install the Docker. You may have to translate the page to English.
-
Execute the following command to process the Docker file on the local PC.
Docker is processed on the root path by default. You may leave more storage space greater than 20GB. If you need to change teh path, refer to:
# 1. Create a new file named "daenmon.json" under the path '/etc/docker/' sudo vim /etc/docker/daemon.json # 2. Add the following content in the opened file to change the path you want to save the Docker file. { "data-root": "/path/to/target_dir" } # 3. Press 'Shift' + ':', enter 'w' + 'q' and then press 'Enter' to save and exit. # 4. Restart the Docker to make it valid. sudo systemctl restart docker -
Please email support@galaxea-dynamics.com or add the customer service on Wechat to get the calibration file.
4.1.4 Build the map
-
Run the following command in the local computer terminal to pull the recorded bag file from the R1 end to the local end.
-
Prepare the bag file and calibration parameter file.
-
Launch Docker and start the mapping process.
-
Check the mapping outcome.
4.1.5 Importing the Map and Calibration Files.
Run the following command to import the map and calibration files into R1.
ssh nvidia@{rorbot_ip} "mkdir -p ~/galaxea/calib ~/galaxea/maps"
scp -r ~/mapping_data/map/* nvidia@{robot_ip}:~/galaxea/maps/
scp -r ~/mapping_data/robot_calibration.json nvidia@{robot_ip}:~/galaxea/calib/
4.2 Start the Localization Function
When starting localization the function, ensure the robot is within the known map.
-
Start the R1 Node.
On the R1 end, run the following commands to start the relevant nodes:
-
Acquire Localization.
Switch the controller to chassis control and mode drive the robot in a circle within a 2m range in the known map environment to ensure successful localization.
In the R1 terminal, run the following commands to check the localization status:
If the following data is returned normally, localization is successful:
4.3 Set the Target Pose Position
-
Remote robot to the target point. After the positioning is successfully started, remotely control the robot to the target point you set. Ensure that the center of R1 is at least 45 cm away from obstacles.
-
Record the pose information. Every time the robot reaches the target point, record the robot pose information at that position.
-
Update the script for sending navigation target point information.
Repeat the above steps. After recording the pose information of all target points, update them to the navigation target point script.
The script example is as follows:
#!/usr/bin/env python
import geometry_msg.msg
import rospy
from geometry_msgs.msg import PoseStamped
from system_manager_msg.msg import TaskRequest, TaskResponse
from geometry_msg.msg import PoseStamped
class NavigationEngager:
    def __init__(self):
        # Initialize the ROS node
        rospy.init_node('navigation_engager', anonymous=True)
        # Initialize the position array
        self.pose_array = self.create_pose_array()
        self.current_index = 0  # Current target position index

        # Set up Publisher and Subscriber
        self.publisher = rospy.Publisher('/system_manager/task/navigation_enage', TaskRequest, queue_size=10)
        self.subscriber = rospy.Subscriber('/system_manager/task/response', TaskResponse, self.response_callback)

        # State variable
        self.engage_pending = False  # Indicates whether the current request is waiting for a response.
        rospy.loginfo("Navigation engager node initialized.")

        # Start sending the first "engage" message.
        rospy.sleep(1)  # Make sure that Publisher has been initialized.
        self.send_engage()

    def create_pose_array(self):
        """Create an array of PoseStamped objects that includes the target position."""
        pose_array = []
        pose = geometry_msg.msg.PoseStamped()
        pose.header.frame_id = "map"
        pose.pose.position.x = 3.280
        pose.pose.position.y = -0.743
        pose.pose.position.z = 0.008
        pose.pose.orientation.x = 0.000
        pose.pose.orientation.y = -0.004
        pose.pose.orientation.z =  -0.147
        pose.pose.orientation.w = 0.989
        pose_array.append(pose)

        # New target point added
        # pose = geometry_msg.msg.PoseStamped()
        # pose.header.frame_id = "map"
        # pose.pose.position.x = 5.761
        # pose.pose.position.y = -0.146
        # pose.pose.position.z = 0.087
        # pose.pose.orientation.x = -0.008
        # pose.pose.orientation.y = -0.001
        # pose.pose.orientation.z = 0.551
        # pose.pose.orientation.w = 0.835
        # pose_array.append(pose)

        return pose_array

    def send_engage(self):
        print("index  =", self.current_index)
        """Send the "engage" message"""

        if self.current_index >= len(self.pose_array):
            self.current_index = 0
        if not self.engage_pending and self.current_index < len(self.pose_array):
            msg = TaskRequest()
            # Set the fields of the message as needed
            msg.task_type = 1
            msg.navigation_task.target_pose = self.pose_array[self.current_index]
            self.publisher.publish(msg)
            self.current_index += 1
            self.engage_pending = True  # Marked as awaiting response

    def response_callback(self, msg):
        """Handle the response message"""
        if self.engage_pending:
            self.engage_pending = False  # Reset the status and allow sending new engage.
            rospy.sleep(0.1)  # Control the tempo of sending.
            self.send_engage()  # Send out the new "engage" message.

    def run(self):
        """Run node"""
        rospy.spin()

if __name__ == '__main__':
    try:
        engager = NavigationEngager()
        engager.run()
    except rospy.ROSInterruptException:
        pass
You can add any number of target points. In the Python file, replace and add the following areas in the Python script.
        # Add a new target point
        # pose = geometry_msg.msg.PoseStamped()
        # pose.header.frame_id = "map"
        # pose.pose.position.x = 5.761
        # pose.pose.position.y = -0.146
        # pose.pose.position.z = 0.087
        # pose.pose.orientation.x = -0.008
        # pose.pose.orientation.y = -0.001
        # pose.pose.orientation.z = 0.551
        # pose.pose.orientation.w = 0.835
        # pose_array.append(pose)
After the target point is set, execute the script, and the robot can achieve autonomous navigation to the target point in a loop.
5. Software Interface
5.1 System Diagram
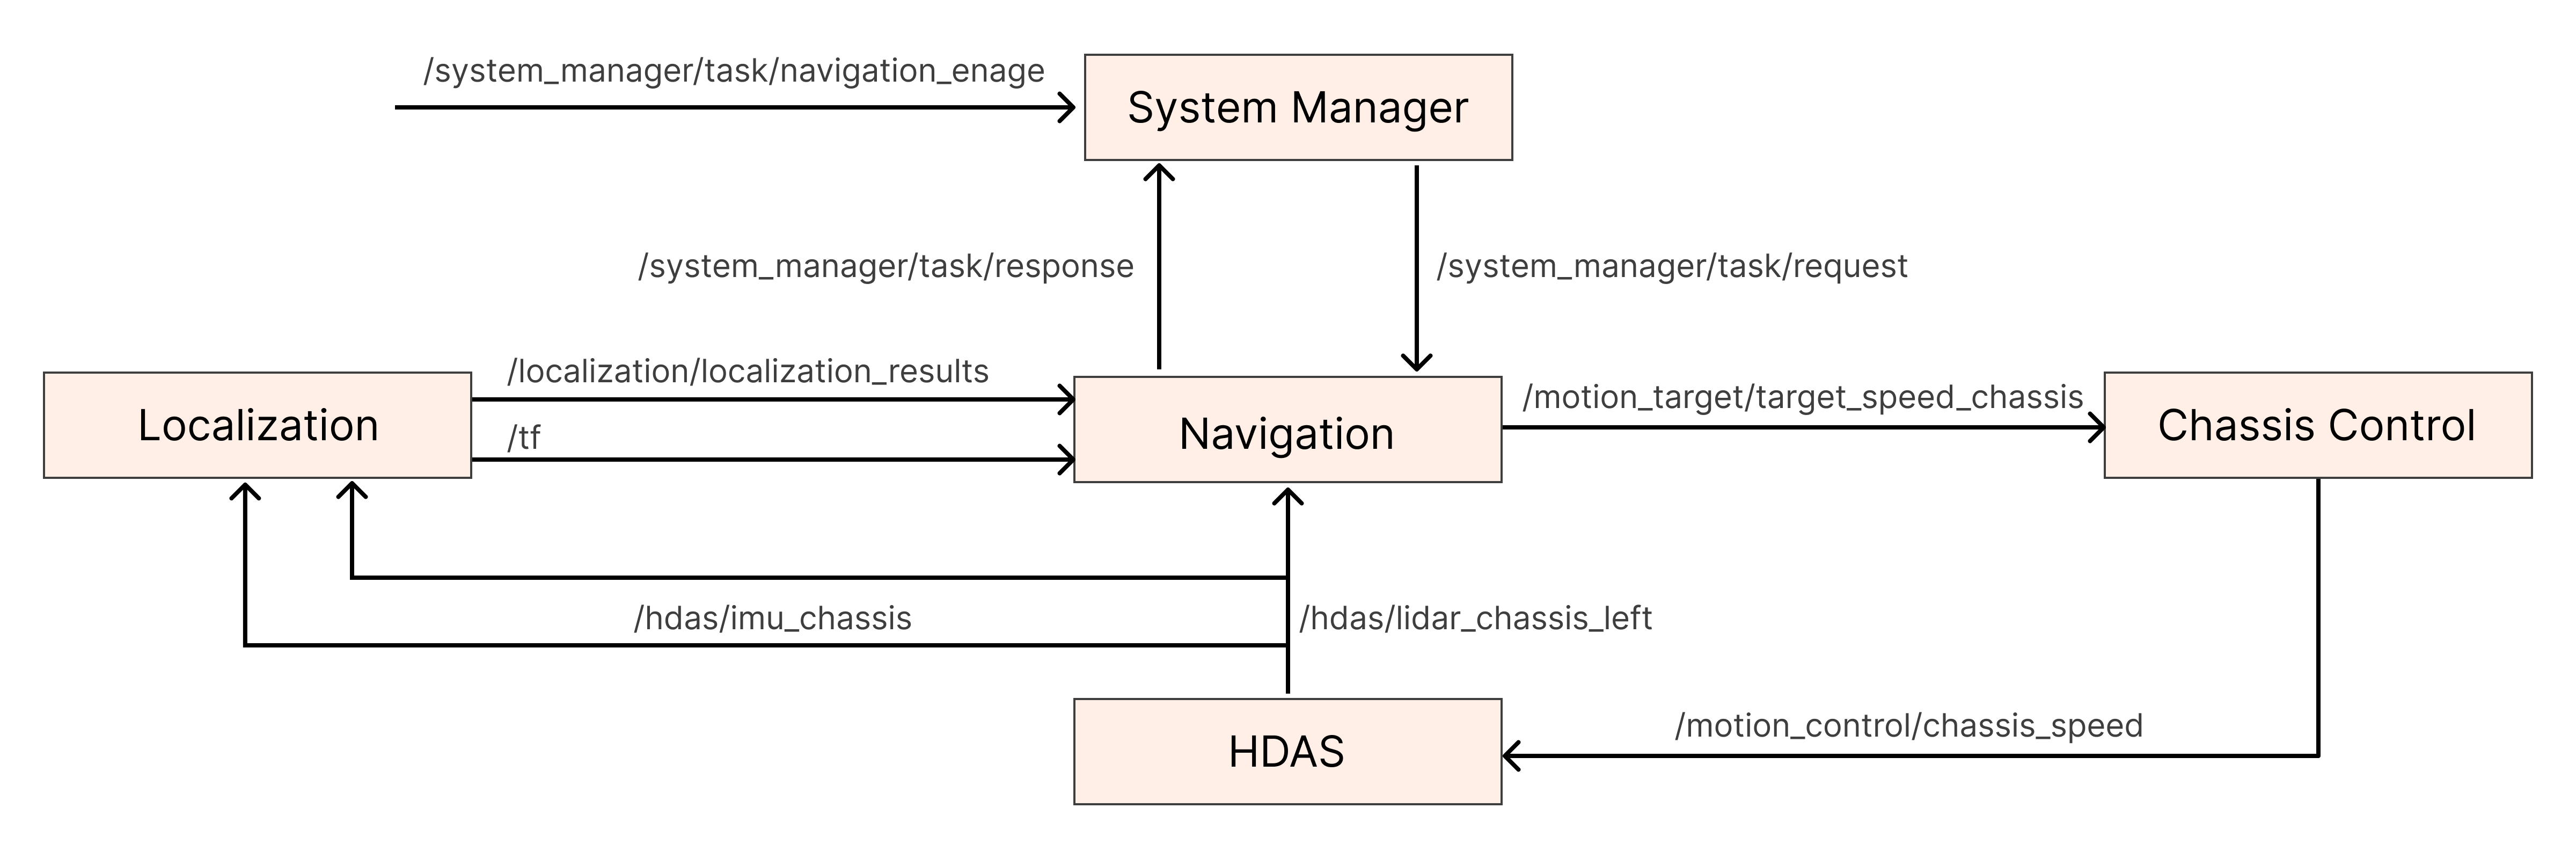
5.2 Driving Interface
R1 offers multiple driver interfaces for communication and control with hardware devices.
5.2.1 Chassis Drive Interface
/motion_control/chassis_speed:It is used for the chassis status feedback ROS package, which defines multiple topics to report the status of the chassis' motors. Please refer to the Chassis Drive Interface in the Software Guide for more detailed information.
5.2.2 LiDAR Interface
/hdas/lidar_chassis_left:It is used for environmental perception and distance measurement, providing real-time environmental information to robots. For more detailed information, please refer to the Lidar Interface in the Software Guide for more detailed information.
5.2.3 IMU Interface
/hdas/imu_chassis:It is used to measure the acceleration and angular velocity of the robot, providing data support for navigation and attitude control. For more detailed information, please refer to the " IMU Interface in the Software Guide for more detailed information.
5.3 Motion Control Interface
R1 offers multiple motion control interfaces for achieving precise control of the robot's movements. Below are the main motion control interfaces and their descriptions.
5.3.1 Chassis Control Interface
/motion_target/target_speed_chassis:It is used to control the movement of the robot chassis, including speed control, direction control, etc. Please refer to the "Chassis Control Interface" in the Software Guide for more detailed information.
5.4 Localization Interface
It is used for the R1 robot to achieve autonomous navigation and environmental perception. Through these interfaces, the robot can receive data from various sensors, such as IMU and LiDAR, thereby enabling precise multi-sensor fusion localization. These interfaces ensure that the robot can accurately perceive its own position and posture in complex environments, providing reliable data support for subsequent path planning and navigation.
| Topic Name | I/O | Description | Message Type |
|---|---|---|---|
| /hdas/imu_chassis | Input | IMU data, used for multi-sensor fusion positioning | sensor_msgs::Imu |
| /hdas/lidar_chassis_left | Input | Multi-line LiDAR point cloud, used for positioning | sensor_msgs/PointCloud2 |
| /localization/localization_results | Output | SLAM Positioning Status | localization_msg/LocLocalization |
5.5 Navigation Interface
It is used for the R1 robot to achieve autonomous path planning and motion control. These interfaces enable the robots to conduct global and local path planning based on the input sensor data (such as LiDAR point clouds and SLAM positioning status), and output control instructions to drive the robot chassis to move. The Navigation interface not only supports obstacle avoidance but also can update the robot's motion trajectory and task status in real-time, ensuring that the robot can complete navigation tasks efficiently and safely.
| Topic Name | I/O | Description | Message Type |
|---|---|---|---|
| /hdas/lidar_chassis_left | Input | Multi-line LiDAR point cloud, used for obstacle avoidance | sensor_msgs/PointCloud2 |
| /localization/localization_results | Input | SLAM Positioning Status | localization_msg/LocLocalization |
| /system_manager/task/request | Input | Navigation Task Interface | system_manager_msg/TaskRequest |
| /nav/local_path | Output | The local path planned by the local path planner | sensor_msgs/PointCloud2 |
| /nav/global_path | Output | The global path planned by the global path planner | sensor_msgs/PointCloud2 |
| /nav/robot_global_traj | Output | The global trajectory of the robot's movement | nav_msgs/Path |
| /nav/global_map | Output | Navigate the global cost map for planning the global path | nav_msgs/OccupancyGrid |
| /nav/local_map | Output | Local cost map for navigation, used for planning local paths | nav_msgs/OccupancyGrid |
| /nav/global_goal | Output | The target point for navigation reception, used for visualization | geometry_msgs/PoseStamped |
| /motion_target/target_speed_chassis | Output | Navigation output controls the speed | geometry_msgs/Twist |
| /system_manager/task/response | Output | The completion status of the navigation task | system_manager_msg/TaskResponse |
5.6 Navigation Service Interface
5.6.1 Start Navigation Service
Executing the following command to start the navigation service.
service name: /nav_service  # Used to start or shut down the navigation system
Type: std_srvs/SetBool
For Example: rosservice call /nav_service "data: true"
      rosservice call /nav_service "data: false"
Note: The navigation service is enabled by default when the robot is started.
Note: Ensure that the R1 robot is in an environment with map data established when the navigation service is enabled, and the surrounding environment remains consistent with that during map generation to ensure the accuracy of positioning and navigation.
5.6.2 Shutting Down Navigation Service
Executing the following command to shut down the navigation service.
Service name: /nav_service  # Used to start or shut down the navigation system
Type: std_srvs/SetBool
For Example: rosservice call /nav_service "data: true"
      rosservice call /nav_service "data: false"
5.7 System Manager
The System Manager is the core management module of the R1 robot system, responsible for coordinating and managing various tasks and services of the robot. Through System Manager, users can trigger navigation tasks, monitor the status of tasks, and receive feedback on task completion.
| Topic Name | I/O | Description | Message Type |
|---|---|---|---|
| /system_manager/task/navigation_enage | Input | Trigger the system_manager to construct based on the target_pose provided by the user, and send the task topic to the navigation module. | system_manager_msg/TaskRequest |
| /system_manager/task/response | Input | After the navigation module has completed the navigation task, it will reply to the system_manager with a topic indicating success or failure. | system_manager_msg/TaskResponse |
| /system_manager/task/request | Output | The system_manager sends the topic of the task to the navigation module. | system_manager_msg/TaskRequest |